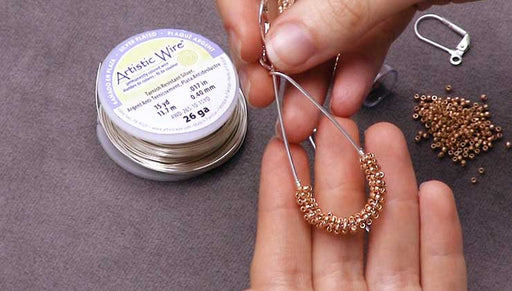
How to Make An Adjustable Slider Clasp Bracelet

SKU VID-1333
Designer: Julie Bean
In this video learn how to make a lovely adjustable slider clasp bracelet. This on-trend design is both elegant and simple in nature. Use the same instructions to create adjustable slider clasp necklaces as well.
FEATURED IN THIS VIDEO
Audio Transcript
Note: This audio transcript is auto-generated and may not be completely accurate.
Hi, this is Julie with beadaholique.com and neat and you see it just a just super easy so for this particular project you're going to need an adjustable slider clasp and right now we have two different styles on my table we've got this little narrow one which is the one you see in the project itself it measures 8 millimeters across by 3.5 millimeters wide and the important part is it does have this little silicone insert and that's what's going to help grip and grab your chains there's also a barrel style right here and this is a little bit narrower across in terms of width it's six point eight millimeters by five point five millimeters and inside it does have that silicone insert as well now we do have chains that do fit these and in the product listings on beadaholique.com we do specifically lists all the different chains that fit these and that's real important because we've actually tested each one out now we brought in specifically for these guys it's really pretty rectangular Rolo chain and I'm going to be doing it in gold BC it comes in other finishes as well and there's also this nice petite fine cable chain as well and this one actually does go with the barrel style so for this project you're going to need a length of chain I've cut one foot I have this wonderful little slider clasp and then you're going to want to do something to finish off the ends because you don't want the chain to ever pull right through so I've got two head pins and two pretty little spacer beads and those are the only supplies I actually need to make my bracelet now I also have some tools I have my wire looping pliers if you've seen my videos before you know I love these guys my chain nose a pair of cutters and to get that chain through the little clasp I'm going to show you a little trick using some wildfire thread and then if it curious what these little guys are these are some of my very favorite chains of all time this is a two millimeter Rolo chain we have a ton of different finishes on the website and this chain too does fit very nicely through that little guy okay let's do this so we've got my wildfire you can use any thread you have at home you can use sewing thread you can use fire line naima whatever you've got basically what we're gonna do is we're gonna go and take our thread and put it through our end chain link double it up so you've got your two ends and feed those two ends right through the middle of your slider clasp and pull so there you see that first chain goes in there really quickly and very easily now we're going to loop it back around so you see we've made like a nice circle which is gonna be our bracelet and we're gonna feed those tails back through want them to line up it'll make life easier so you see I'm holding the chain down so it creates a gap in the top part of the silicone well goodness gracious let me cut those okay again hold your chain down have that nice gap up top feed your thread through so it is an advantage to have a little bit of a stiffer thread just because it does poke right through but I have done it with my mo before and it works just fine okay so now just pull and it pulls right through and you want it to have a little bit of a grip to it you don't want it to just slide super easily through because then it won't actually stay a just it on your wrist or if you're making a necklace so we've got both ends through and you see we can just pull them and that's what you want you want that where it's easy to pull in terms of you can pull it but you don't want it where just pops right out you don't want it to be like slippery feeling you want to have some grip to it please do reference the product listings where we've listed chains that we recommend to fit these guys okay to make the little dangles we're gonna put our little bead onto our head pin we are going to use our wire looping pliers create a little loop loop it around but you can do two things right here you can make a simple wire loop and just snip or the wires crisscross or you can make a wrapped wire loop I want to make a wrapped wire loop but I want it to be attached to my chain so I don't have to add an extra jump ring so now what I'm gonna do is I'm gonna make that loop open it just a little bit slide on my end chain link grip it and wrap it I think it's just a little bit more secure this way than a simple wire loop and you don't have to make too many wraps just snipped off the excess wire I always like to go back with my chain nose and tuck in any loose little wire ends there we've got one little dangle done and I do actually like how this your little bead mimics that main one so I know our designer rachel has already made a necklace using these guys and it looks great it's fun if you can turn instantly a long necklace into a choker and vice versa so it gives you a lot of different options with your jewelry okay so we're just going to add this other dangle again just that end chain link pull it on through so it sits in there in your loop and do a couple laps trim and tuck and we're done and there we have a very pretty very elegant looking piece of jewelry and it does just slide and then you can pull these guys it actually helps to have the little dangles you want to pull so you just pull them as well and a great gift item or a great little gift to yourself so all the supplies you've seen here and all the information about what you've seen here as well are available at beadaholique.com you

You recently viewed

Clear recently viewed