How to Use the Baby Jewel Loom featuring the Miyuki Round Designer Palettes

SKU VID-1341
Designer: Kat Silvia
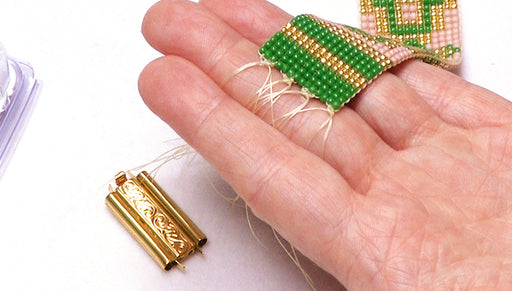
In this video you will see the differences between the Baby Jewel Loom and the regular Jewel Loom by Beadalon. The Baby Loom is about half the size of the regular that makes it perfect for creating focal loom pieces and earrings as seen here in the Sequoia Bracelet and the Tortuga Earrings. Both of these projects are made using the Miyuki Rounds Exclusive Beadaholique Designer Palettes.
Audio Transcript
Note: This audio transcript is auto-generated and may not be completely accurate.
Hi, this is Kat with beadaholique.com so if I'm just gonna kind of hold them end to end here you can see that the baby is about half the size of the jewel loom so you can do different types of projects so for example the jewel loom I have up here a couple of full loom bracelet projects here and these are actually using our Miyuki designer palettes so I have one example here and another here and then if you'll notice I wanted to do a loom focal but instead of wasting all that thread on the full jewel loom I was able to create this on the baby loom and again this is uses all of our me you keep alit's here so I'm going to start something on the baby jewel loom and I'm actually going to be making the pair of this earring here and this is the tortuga earring so if you want to look at beadaholique.com you'll be able to find the full tutorial there but I just kind of want to start by talking about the baby Jewel loom in relation to they fold jewel loom you know you'll notice the main difference is that there is no bar here so it will remain curved with the jewel loom you'll get it and it'll be packed flat and you'll have to actually insert this bar to give it that sort of shape now mine's been in there for a little while so it does retain that shape but it will come flat to you so but I'm just gonna go ahead and put that back there so you'll see how the jewel loom and the nice thing about the baby loom is that it has the little pegs on the back there which is where we're gonna anchor our thread but it actually provides a nice little stability on the table there for you so I'm gonna be using Nemo size D and I'm just gonna take a little bit off my spool here flip over my loom and I have a couple of threads left on there from my previous project but I'm just gonna tie a little double and overhand knot right thing and this is just gonna help to anchor the thread that I'm going to be adding to the loom there all right and now I'm just gonna take my thread and just wrap it a couple times around there just to give it some anchor there we go so now I'm gonna bring that thread oops up and over and I'm gonna start it kind of off to the side there and find it in one of those little grooves now it doesn't need to match up completely because you'll see that it just needs to get across there and then on the back I'm gonna wrap it around and then bring it up and forward and then you kind of do this real quick and then I'll flip it over for you so you want to have those nice little notches with your threads in them right up and over and for this particular earring project here I am doing sixteen or I'm sorry 15 rows of beads across 15 columns there and I'm gonna need 16 of these threads so you just keep following the grooves and it fits really nicely in there and I'm keeping good tension on those threads they're just wrapping it around and up and over and this is the exact same technique that you'll use when you're wrapping your regular jewel loom so it's the it's the exact same alright I'm gonna go a little faster here and if you want to if you're feeling it's not anchored enough you can always wrap it around again just make sure that you're getting your threads nice and tight here and I've totally lost count so I'll have to go back and double counter that's alright alright and what's nice about the jewel image you can see that I'm not skipping any grooves here but let's say you wanted to use the loom with larger beads you can skip over too if you like so it actually works out to be a really nice little system here alright you may just second I want to count mine so I need one two three four five six seven eight nine ten eleven twelve thirteen 18:15 perfect alright and my last one is 16 all right so now I'm gonna come and I'm gonna wind it around a couple of times there and I'm gonna snip off my spool of thread take my two little ends here and just tie them together and again just wanting to keep good tension on there and I'm just gonna tie another knot and you'll end up clipping all of this off in the end but just you want to make sure your threads are nice and secure alright so now I have my own loom all set and ready to go and all those grooves are nicely placed there so the only thing I have left to do here and I'm just gonna do a little bit on camera here I'm gonna kind of finish this off camera but I just want to show you how to fully start it and this is actually a really fun little project and I just want to show you that there is also a booklet here that comes with your baby jewel loom and it'll actually show you different ways that you can actually use wire with this as well so this will help if you wanted to create some beautiful pieces so this comes with your Jewel loom so lots lots of fun to be had with the with the baby loom cuz if you imagine if you're doing something on wire and you're making a short piece you definitely don't want to lose any of that wire because wire can be expensive and if you're making something let's say out of sterling you want it to be nice and cost-effective as possible with as little waste as possible alright so let me just point out something to you really quick here on this particular earring you'll notice that I'm gonna start with a full row of blue beads but what's gonna happen is those are gonna actually end up in that channel there so for my first Rose I'm gonna pick up 15 of my blue beads here and these Miyuki rounds are really really nice and like I said I love using the pallets for especially loom work it just makes the guesswork just so simple you know there is no guesswork all right so you can just see that I'm taking and placing it underneath and wanting to get my finger under there and the first row is always the hardest cuz you're sort of setting up your loom and just settle that in perfect there we go all right oops and I'm I whittled it mm-hmm and I'm just gonna pull my thread through making sure to leave a good long tail of about eight inches or so because you're gonna want that to tie in at the very end and now taking my needle and just making sure to go above the threads so you can see that I'm just taking my time making sure that those seed beads sit above so that I don't have any fallout on the other side there we go so that is my first row so I'm gonna do another row real quick here on camera and this will be my last row so I'm gonna do two white and I'm you can see I'm just following that first pattern there two blue one gold two white on the gold - wait one gold - blue and - wait all right so now again and I generally work right to left but you can also if you're left-handed or if you prefer you can always go the other way as well just as long as you're consistent throughout your piece I just prefer to work this way but you'll get the same same effect both ways so that's actually kind of it's a nice little little thing with the loons alright oops and I realized that I did not pick up my pattern correctly I have one extra high bead alright there we go all right and now situate this guy up there and see how much easier that one was to pop in there nice and easy I'm just gonna pull that through and now string it back through the other way making sure to stay on top of those threads and there we go my second row is now completed so now you just continue on with the pattern that you want and we have many finishing techniques that we talked about with the jewel loom they will all be applicable to the baby loom as well so you can always just snip that off you can add two leather pieces you can add ribbon slides which are just nice and a classic way to finish that off but I'm gonna go ahead and finish this off camera and then you'll be able to find the full tutorial at beadaholique.com and I hope you enjoyed this video if you did be sure to hit the subscribe button below you

You recently viewed

Clear recently viewed