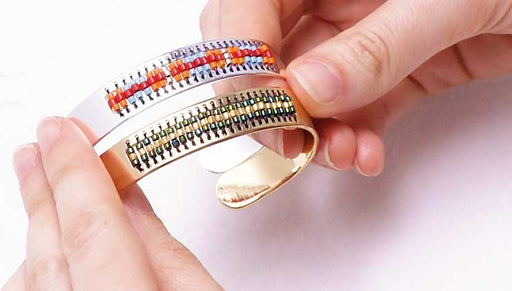
How to Attach a Vertical Loop Multi-Strand Clasp to Peyote Bead Weaving

SKU VID-1321
Designer: Kat Silvia
In this video you will learn how to attach vertical loop multi-strand tube clasps to odd count peyote bead weaving. You will also see an example of peyote bead weaving with a horizontal tube clasp. We do have another video showing you this technique, How to Attach Tube Clasps to Peyote Bead Weaving.
FEATURED IN THIS VIDEO
Audio Transcript
Note: This audio transcript is auto-generated and may not be completely accurate.
Hi, this is Kat with beadaholique.com peyote bead weaving now I have my piece of bead weaving here and you can see that I've already done one side of my class but I want to kind of draw your attention to the reason that this class is a little bit different from the other ones that we've had in previous years so we have this is the vertical loop and this is the one that we're going to be featuring today in this video but we also have these sort of horizontal loop and I'm just going to bring in a kit out ours to show you this is an even count peyote but you can kind of see how the orientation of the loops you have to sort of alternate to get them to kind of lay in between so those loops and then you can see on this side where it's a little bit more flush and flat for that bead weaving so that's just a little same very similar technique that I'm going to be showing you in this video and you can kind of choose either/or and the thing that I like about using odd count with use is I have chosen a five loop so it actually fits perfectly with my bead weaving and might be in count here so I do want to point out that we have many colors we have some beautiful antique brass silver we have a gunmetal we have a beautiful beautiful copper so bright and shiny we have gold we have the antique copper which is what I'm going to be working with today we have an antique silver and then this is another type of design and it has those horizontal loops like I was saying but it has a beautiful little spiral texture to it so we do have these in silver and gold and all of these come in it the various sizes you can see we have two holes five holes for three so whatever with your piece is going to be you have a clasp to match so let's go ahead and dive right in to doing our clasp now like I said I did one side of my class already so the next step is to just unhook it and you want to make sure that it is going to fit exactly the same way so we're going to branch straight across here so you want your little sort of knots your little pinheads here to be opposition so that when you close it up it'll slide right together okay so you can see on my first side there that I had the pattern continued with the same color so I'm going to kind of continue that style on this end now yours might be a little bit different if you've followed this pattern because you can make it as long as short as you want but just kind of follow along with the colors that are here and I'll show you how to do that alright so I have my thread coming out of my bead right here so all I need to do is I need to weave down through a few adjacent beads to come up to that third up speed so impaired to be leaving it kind of jigs and jogs so you're referring to things as up beads and down beads so when I say up Ede it is the one that is sort of sticking up so this is my third up feed so if you count one two three that's where we are so now I'm going to need to add four beads so what I'm going to do is I'm going to pick up two of my gravies and since I'm going to be creating a little loop and going into the next up bead I'm going to pick up two of those maroon beads all right and now just making sure that my clasp is correct I'm just going to go through that very first loop and string it all the way down there we go and now I'm just going to go into the next up bead and it's that nice little maroon one right there all right go just got a first one you just got to kind of hold it with your hand and kind of orient it also you want to make sure that you have two beads on either side of your clasp there we go so just like so so now we're going to continue and you can kind of now see where the other beads are going to start so what you're going to want to do is you're going to go into the next down bead and then up into that next up bead and then we're ready to add our next loop and since you can see in my pattern here I'm going to be coming from a maroon bead to a maroon bead I'm just going to pick up four of those maroon beads now I am using miyuki delicas in the eleven off size and this is great for peyote they just fit like little tiny bricks together just orient my thread back there we go and go down into the next up bead and you'll just continue this all the way across here and like I said you're just going to kind of adjust as you go all right there we go and now go down and I'm going to come up and it looks like I'm going to catch those mint beads so I'll create one that is using four of the mint color again through that loop making sure your thread is out of the way and go down through the next up mint bead and if you want to catch two beads at a time I know people can do that sometimes I like to just keep it clean and just make sure especially on this first pass once you're done going all the way through I definitely suggest going all the way back through to just secure your work especially since this is your clasp and you don't want it to fall off all right all right so we are now cooking you can see how it's starting to develop so again I'm just going to pick up for those maroon beads go into that next loop and you can see that it's much stronger now and much easier to get those beads to orient because our clasp is starting to come into place okay and be careful forcing your needle through some of the beads I know it will start to get tight in here but these are glass beads so you definitely don't want to adjust them too much all right there yeah so just going to kind of adjust some beads here just want to make sure everybody's happy there we go all right and for the last one here I'm going to start with two of those maroon beads and since I'm going into a gray bead I'm going to pick up to Grady it's then going into that third gray bead you just want to make sure that you landed where you were supposed to on that side alright so yes you can see how nice it looks when you just sort of continue that pattern across the way so all I'm going to do now is I'm just going to leave my thread in and tie it off let's see here I just want to go through a couple more beads here alright just to make sure it's nice and secure there we go okay so what I'm going to do is or what you can do is up to you you can turn your thread around and go back and follow that just to give it a little extra security and then you can tie off and weave in your thread so that is how to attach a vertical loop clasp we do have another video showing you how to tie off your threads with peyote be leaving so if you need that video I'll provide that for you in the links below but I hope you enjoyed this video you can find all of these supplies and even more videos at beadaholique.com you

You recently viewed

Clear recently viewed