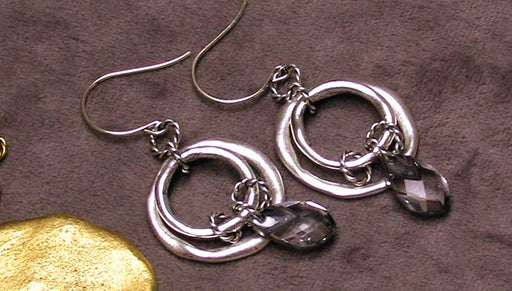
How to Make a Pair of Resin Tortoise Shell Earrings

SKU VID-1581
Designer: Kat Silvia
In this video you will see how quickly and easily these vintage-look resin tortoise shell earrings come together. Thanks to the lightweight nature of the resin, they are comfortable to wear all day long!
Audio Transcript
Note: This audio transcript is auto-generated and may not be completely accurate.
Hi, this is Kat with beadaholique.com things are really cool this is actually you're kind of a vintage e look so you've probably seen this before so this is what we mean when we say tortoiseshell so it's not actually tortoiseshell it is made of resin so it's kind of almost like a plastic but it's really nice and thick and strong and you get this beautiful light sort of shining through it and really really fun and what I love about these is these are nice and lightweight so even though it kind of looks like it's gonna be a big of a little bit of a statement earring they're nice and lightweight so before I jump into my earring here I just want to kind of point out some of the other styles of the tortoiseshell that we have here so that you guys can really see not only how different it is and how unique each piece is but just how you can you know swap it out so let's say if you didn't want to do the rectangles here you could do a nice oval shape there as something a little bit different or if you wanted to add an extra link you can see that this one here has one hole and this one has two so you can make it even longer so there's a lot you can do with this you can add in all kinds of different things that's another sort of little style of the link if you wanted to continue to go with that rectangle shape lots of fun stuff to do with this so be sure to head over to beadaholique.com and you can shop all of these beautiful elements and these are from Zola so you can shop that brand and I've provided that link it down below for you alright so let's get into making our earrings here so we're gonna do a little glue here so we're going to be using some e6000 and we're gonna be doing our little glue on pads and then really simply we're gonna be using six millimeter 20 gauge jump rings to attach these so this is gonna come together really fast we just need a couple pairs of chain nose pliers and then for my glue I have a little piece of paper here and a little toothpick there to help me you can also use a little scrap of wire as well alright so let's dive into talking about our glue on pad here so I've chosen silver findings although I feel gold goes better with the tortoiseshell but reason I wanted to use this is this is actually a surgical steel so this is going to be good if you have sensitive ears and my little bullet clutch here to end on the other side is hypoallergenic so if you do have sensitive ears and you wanted to wear something lightweight that's why I wanted to go with that surgical steel all right so it is a six millimeter pad there and if you can just see there's the hole at the very bottom and what I want to do is because we're gonna be hanging our earring from the bottom there you don't want to place this right in the center you could but what I would recommend is trying to scooch that up a little bit more towards the top there so that it's gonna hang a little bit lower but it is entirely up to you but that's why I wanted to give you the freedom here with this project so that you can kind of move that around if you do want it lower so that this it's a little higher on your ear I know everyone has different ear lobes and so you can kind of make this your own so that's why I didn't want to use a bigger pad and also this is lightweight so that six millimeter is gonna be just fine all right so let's go ahead and actually attach it so let's get some e6000 onto our table here and we don't need a lot actually I'm gonna squeeze out just a little more theoria and go ahead and take your toothpick and just get a little dab on there and go ahead and add it to the top of her little pad yeah you can see that I actually scoops them off alright so now that we have that ready to go what I'm gonna do is I'm gonna place it on to the earring pad there and you do have a little bit of time to kind of move it around and I'm gonna face this towards me here so that I can really make sure that it is nice and centered and mine is towards the top there beautiful alright so I'm actually gonna set this aside and we're gonna pretend that I did that on this one as well because I want to move on to the next step now I will say this see 6000 does dry fairly quickly but because it's going be in your ear we recommend at least 24 hours before actually wearing the pair of earrings just to make sure that it's nice and set we don't want anything to happen to your earrings all right so we're just gonna take one of our jump rings here and finding that seam let's go ahead and gently twist that open and we're gonna slip on our rectangle and the little hole there there we go so the top of our earring so just gently twist to close it and then that is the style that we have and you can just pretend that I have that nice glue on back there so that's kind of how it's going to look and how it's going to hang so you can also do this step first and kind of see where it's gonna lay on your ear and then determine where you want that post to be but that is how easy it is I'm not going to do that second one because I'm gonna let that part dry but we're just doing a little jump ring and a little glue and we have a great fashion-forward pair of earrings that's got a nice little vintage Flair so that is how to make a pair of resin tortoise shell earrings you can get all of these supplies by heading over to beadaholique.com and be sure to shop all the latest from Zola elements

You recently viewed

Clear recently viewed