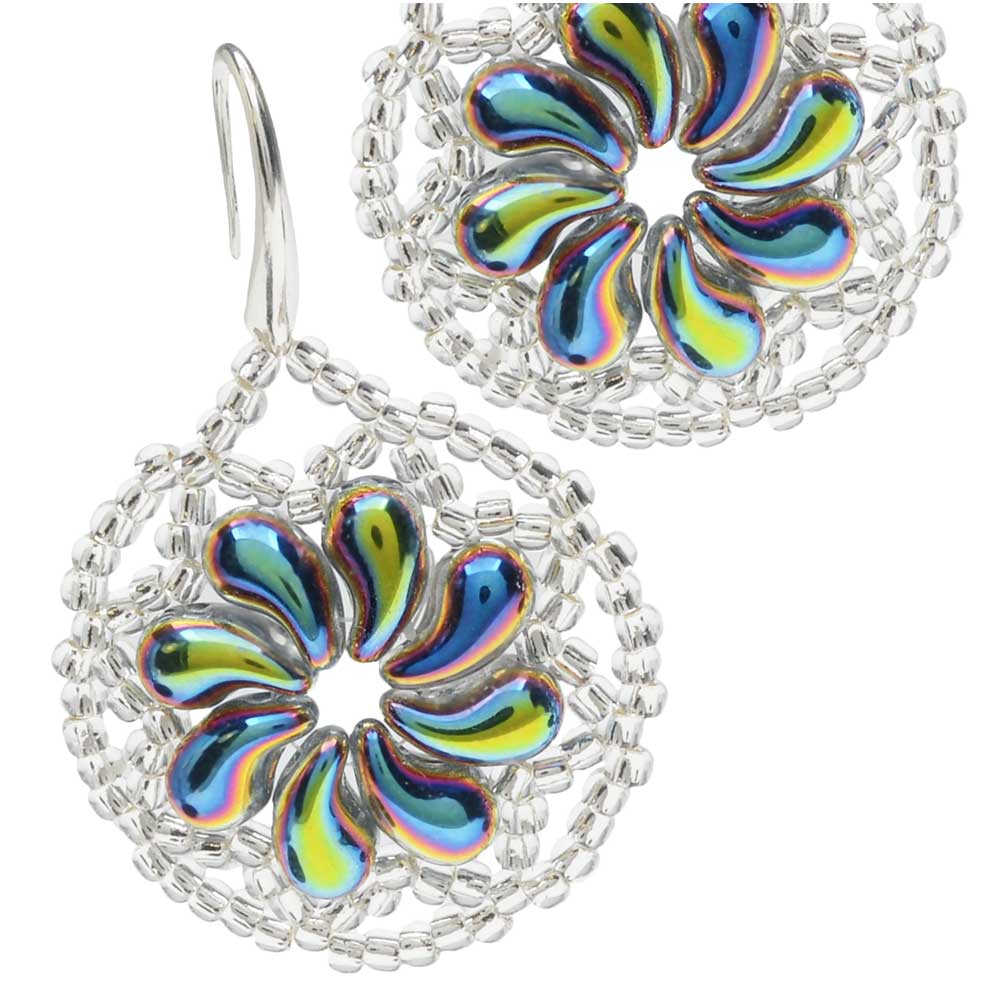
FEATURED IN THIS VIDEO
Audio Transcript
Note: This audio transcript is auto-generated and may not be completely accurate.
Hi, this is Kat with beadaholique.com and they are two whole beads and what I love about them is that they have this fun little paisley design and they're rounded on one side but then flat on the other side so they can you can really create sort of really dimensional jewelry and the cool thing is is that these actually come in a right swirl and a left swirl so if I can draw your attention up here to one of the other projects that I had done and I'm gonna be doing this in a separate video so if you want you can look out for the Orleanians bracelet but this showcases how you can use the different sides to create cool little sort of floral shapes and they just look like little tiny commas or almost like little teardrops so if you look up here we have a couple of different of the various colors that we have so I just love these alabaster pearl colors they're just really really gorgeous and nice and saturated we also do have some beautiful jet and bronze colors to create some lovely little designs and then over here I just want to kind of point out we have some cool little edge designs and these are just really kind of fun they almost have like a little scratch surface so you can make something that kind of almost looks a little bit drusy like and then we do have some other beautiful colors here as well but I want to draw your attention now down here so what I did is I took two red head pins just to kind of go through the holes there to really showcase the two holes and sort of where they sit on these beads now what I have here it's the same side of the bead and it's just going through you can see it goes through the bottom that largest portion there and at the top at like sort of that smallest portion so you get a really nice little look by putting together those all I do is sew really really fun and the nice thing is is that so for the example of the bracelet that I'm going to do later and it's two colors so you have to buy the left and the right they are sold separately so you have to buy a lot to make this bracelet but the nice thing is I want to create a pair of earrings where you only had to buy one side because we're just kind of doing a nice little floral swirl and then you can just see by kind of changing up the colors you really get a completely different look so this one here uses some silver lined seed beads to create a little bit more of a lacy look around those alle duo's and then this one it's a little bit more saturated because I wanted to use the pastels le duos and a matte seed bead so it's almost a completely different design but they are made in the exact same way so for today I'm gonna be doing this version here just so you can really see it so we're just going to be doing an easy little earring hook that's the only finding here so we're just gonna be sewing that into our beadwork I'm going to be using these LED O's here and then I have some 11 o Toho seed beads I'm going to be using a size twelve beading needle I also have a pair of snips as my tool and then I brought out two different colors of fireline just because we don't get a chance to show these side-by-side as often so I'm going to be using the four pound fireline and this one is the black satin and this one is the smoke so I just want to give you guys a chance to kind of see those next to each other now we also have crystal which hides if you're using a lighter color bead but I just wanted to point out that I'm gonna be using the smoke because while my beads are darker they're not black if you're gonna be using a black bead I recommend going with the black satin so this one is the smoke and this one is the black satin so it's a very subtle difference but it's kind of good to have on hand in case you do end up working with black beads alright so I'm going to set that aside and all I'm gonna do is I'm going to cut off a length of the smoke fire line about five feet and I'm gonna go ahead and thread my needle so if you have all of your supplies ready to go go ahead and thread your needle and I'll be right back to start our earring all right so I have my needle threaded but before I start picking up any beads what I want to do is I'm gonna kind of pull my beads out and sort of make my little circle now for this particular earring we're going to be doing eight two O's someone to do four just to make sure that they all line up and they're all cut well go and so one two three four or five six seven eight okay so that's what my little swirl is going to be so now what I want to do is I'm just going to kind of separate that out a little bit I'm gonna take my needle and I'm going to go in to the center hole there and again you just want to make sure that you're picking up your beads on the same direction because like I did show you they do have one side that is flat so if you kind of look at the side one sides flat and one has that rounded side so just make sure that you're picking up your beads and the right sort of order here so if they get flipped around you'll notice right away but just want something to be aware of when you're kind of working with a bead like this where it has a little bit of dimension you just want to make sure that you're sort of picking it up on the right side going all the way around all right there we go and now we're gonna slide it down until we have about a few inches or so I'd say about six inches on our other side and now we're just going to take that and do a little overhand knot and just kind of pull that down now you don't need to pull it too tight we're gonna sort of tighten it up here in a little bit but and then we're just gonna tie another knot just to secure it and just make sure you don't catch any of those other B it's perfect alright so now we're gonna kind of lay it down so you can see this is the backside here with all those flat sides and I'm gonna flip it over here alright so now you can see that my thread is coming out from where that little knot was so the first thing I want to do is I want to turn my thread around so I'm going to create a little thread bridge it's going to go over the little side there and just kind of going back the opposite direction just like so all right so now we're gonna do the first part and we're gonna add one of our 11 OC beads in between each zolly duo and this is going to kind of go around and catch the outer edge all the way so this is just gonna help to bridge that little gap now again don't pull too tight we're gonna need a little bit of slack here because we're gonna go back through all of these beads and sort of add on the little lacy bits I couldn't get my tail out of the way and you can do these with any of the colors it's really fun and if you really wanted to I did say that you could make this pair of earrings with both the swirls going the same way that way you only have to purchase one lot of the Zahle duo's but if you did want to you could absolutely purchase the other side facing of this all I do is that way you could have the swirls going opposite directions for your earrings so it's just entirely your choice that's sort of the great little thing about these beads all right so we're coming to the last one here there we go we're gonna go through that is all I do and then through that 11 OC bead so now we're coming out the 11 OC bead there so we have our little seed beads kind of bridging the gaps for us all the way through alright so now what I want to do is I'm gonna pick up five of these seed beads four and five and now I'm gonna kind of skip over that is all I do and I'm gonna go into the next 11o seed bead and this is gonna sort of help to complete that little petal look so just like so alright and we're gonna pick up five more and you guessed it we're going all the way around like this and I love these iris mat seed beads it really gives a lot of style to the look here so that you can just sort of see it kind of develop its really really pretty and what I love is these earrings actually work up very quickly and if you didn't want to add an earring hook you could always add a closed jump ring on the top and you can make a nice little pendant necklace as well so if you wanted to make a nice little set you could do that for five make sure you're counting your seed beads don't want to skip one or add an extra one two three four and five all right so now what we're gonna do is I'm gonna go into that seed bead there and that completes that section so I'm gonna go up and go through the next three seed beads here so that I'm coming out the top all right give it a nice little tug we want a little bit of tension not too much alright so the next part here is that I'm gonna be connecting that the next sort of circle all the way around so again we're gonna just be picking up five seed beads three four and five so now I'm going from this seed bead to the next top seed bead here you can kind of like pull it up a little bit so let me pull that through and then I'm going to show you there we go so I was coming out of this seed bead right here and if you want you can count one two three four five and you go through the sixth one which is the one at the top of the next sort of section alright so let's do that again one two three four and five coming out of this seed bead and this one sits up a little bit nicer so you can kind of see how it goes through there one two three four five and again making sure that you're going into the next center one sometimes you might need to give him a little help to sit up a little bit there we go and you can see that it's getting a little bit tighter with the tension which is absolutely fine the nice thing about this is it is gonna have a nice segment of movement here three four and five there we go all right so you can see I've worked my round way around so I have two more than I have to go through so I'm gonna finish off this last one two three four five and now this one's gonna be a little bit different so we've worked our way all the way around and it's been five seed beads on everything it's except for this one that we're going to do here so what we're gonna do is we're gonna pick up one two and three and then we're gonna pick up our earring hook now I want to make sure that you understand to put the earring hook the right way so you're going to need to kind of face it towards the back and then go through this way because you're gonna want it to sit remember how there's a right side with the solid ooh so you're gonna want to sit the right way alright so then we're gonna pick up one two three and then as though we didn't skip a beat we're just gonna go down into that seed bead there and pull that and you'll be able to see before you do any more weaving just to make sure that your earring hook is facing the right way so now what we're gonna do for security is I'm gonna just weave all the way around and back up through that at least one more time just to make sure that it's nice and secure and this is why if you want you could use a thicker thread but I personally like to use a thinner thread and go through multiple passes I do think it makes the bead work a little bit stronger but that is entirely your preference I'm using the four pound of the smoke fire line and you can see that you're not really seeing a lot of that thread I only created one thread bridge so far and the nice thing about that is that you can use a smoke and it'll actually sort of fade into the beadwork so but again if you are using black beads go ahead and use that black satin it's actually a really nice finishing look all right and you can already tell my beadwork is getting a little tighter going around once more and just to remind you you can get all of these supplies that you see that I'm using here today at beadaholique.com the descriptions are in the notes below so if you're curious about the color or size if you missed it as I said it today go ahead and check below also be sure to check out all this LED oohs oh and you can just see that I just went right through the hook there so these are really fun little shapes and you can actually use them with a lot of the sort of multi whole beads all right now if you want you can go around a third time I mean I'm good with just two times here making sure to not get my earring hook in there all right so now all I need to do is I'm just going to kind of weave back down into my work here and I'm gonna go underneath and I've caught a little thread bridge there oops there we go and I'm just gonna create a big loop I'm gonna go back through and I'm gonna tie a little knot there and that's gonna help secure my work so now I'm just gonna go through another couple of beads there and trim off my tails there we go and you can if you want here what I'm gonna do is I'm gonna take my needle off my other piece of thread grab that thread that hopefully quickly oh good nice and easy and I'm just gonna set it sort of put this through a couple of the other beads down here at the bottom just again just to kind of move it along just make sure it doesn't pop out there we go there one and I'm gonna tell you a little not the same way just going under that little thread bridge and we're just gonna go through one more bead alrighty just get your snips in there and snip it off all right so that is our little lacy earring you can see he has a little bit of movement to him but I really like that it lets it kind of shimmer and dance so that is how you can make a pair of lacy earrings with these oli duo's so be sure to check out all the colors that we have and we're gonna have even more tutorials using these so if you are excited by those LEDs be sure to check all of that out by going to beadaholique.com you

You recently viewed

Clear recently viewed