How to Use the Baby Jewel Loom with Artistic Wire

SKU VID-1775
Designer: Alexandra Smith
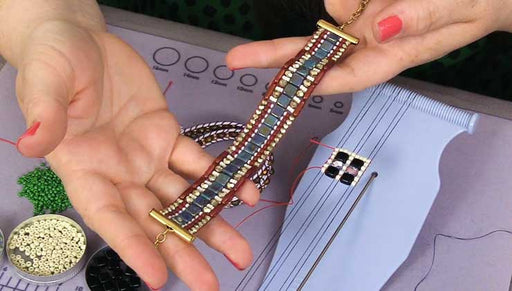
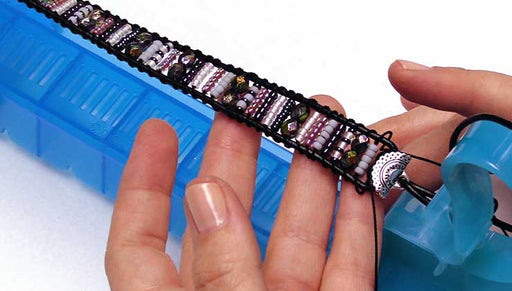
In this video, you will see how to use the Baby Jewel Loom to create a beaded component with Artistic Wire, Griffin Silk, and 8/0 round seed beads. You will see how to set up your loom with 26 gauge wire, weave the seed beads in the order shown, tie off and weave in your silk thread. Finally, you will see how to finish off the ends of your warp wires using wrapped wire loops.
Audio Transcript
Note: This audio transcript is auto-generated and may not be completely accurate.
hi this is Alexandra with beadaholique to use the baby jewel loom with artistic wire so here's a sample piece that I made it's just a component that has eight warps using the six Oh size seed beads and you can see I finished each off with a little bead cap so we're going to do a similar process here using some size down components I've got eight Oh beads and some size two Griffin silk I had used for on here we've still got the 26 gauge wire same as this except we're gonna do gold and for tools what I'll be using is the baby jewel loom which if you're not familiar with we have a video please visit how to use the baby jewelry loom the pure would like and we're also gonna have use a big eye needle for other tools I have cutters I have round nose pliers chain nose pliers nylon jaw pliers and a pair of scissors so let's get started I'm gonna bring in my 26 gauge wire and I'll be using approximately six feet of this but I'm not gonna take it off the spool to begin with because I want to make sure that I have enough and the amount will vary depending on how many weft threads you use so I'm gonna take the end of my wire and begin by securing it around one of these buttons in the back coming around a few times make sure I get a nice connection there then I'm gonna come up over one of these grooves and secure it down in come across the length of the loom and over the back side to the other piece here and secure now I'm gonna space for my size eight o beads to groups apart to make sure I have space for my pieces to go and if you're familiar with loom work you know that oftentimes 900 thread or fireline are used so the stiff wire is a bit of a departure and it opens up possibilities for different design aspects like finishing off making pendants and earrings and different sorts of components three four five actually been to do nine warps so I have four more okay so completing my ninth floor I'm down into that last groove around the back and get a nice secure connection come around three times just to make sure and clip my excess wire so that's how it looks if you want you can take your nylon jaw pliers and come in and kind of straighten those out if you want a little bit once you start weaving they're gonna be tightened up so now we're ready to start weaving our beads I'm gonna bring in the Griffin silk which has a needle attached and it's about six feet worth so with my little wire needle I'm going to begin picking up eight gold beads and once those are on my needle I'm going to keep them on that wire needle portion come underneath my warped beds my warped wires and secure those beads into place between each of the wires and this can be the trickier part of the project just put your index finger underneath there get them caught one for each left thread warp thread brother the cord through now I'm going through the underside of the loom taking off as much as I need of the silk from the spool and I'm going to come back over the top of those beads to secure them in the same way that I would for regular beadwork that this good little threaded needle makes it a slight bit trickier to get it over you just want to make sure you're over every wire and pull that through so we've got our first line of beads for my next row I'm going to use purple so what got my eight purple beads on and I'm going to come underneath and lay those up into the warp threads let's switch fingers and get that nice and secure I'm gonna pull the thread through get a good tension on there and string back through the other side now there are waves of using stiff wire to come through each row of beads you're absolutely welcome to do that as well this is just a alternative using the stiff wire for the warp threads and a soft record for the weft all right so next I'm going to add nine turquoise beads in the same or 8 v 8 bead sorry in the same fashion and I'm going to continue that pattern for a total of nine rows all right so I've added my ninth row of beads in the pattern and I'm ready to tie off and weave in my thread and you can see that I've done that on this side already with my tail and I'll show you exactly how that was done then take my scissors clip off and leave myself at least 6 inches to work with and what I'm gonna do is put on my big eye needle now it's gonna make it easier to get underneath my thread bridges and make my knots alright so now I'm going to come back through the beads that I just actually I'll come back through the row up above and I'm going to double back through the row below just to make sure it's nice and secure because off of this edge is where we're going to be creating some wire wraps so it's good to reinforce that so I'm going to come back up just a bit into this second row and create a little knot by coming underneath the thread bridge and tying in I'm gonna come through once there and then travel through a few beads I don't want my not to be too chunky so that it won't fit into the holes of the beads and because I'm essentially tripling or even quadrupling through the beads now I want to use my pliers just help me get through there now just secure I'll come up into the next row and make one more little knot and we are and you always have the option with the big eye needle to actually take off that thread needle from the griffon and use this instead if you find that easier to to weave with because that other needle can be very thin all right so I'm going to weave in and clip off my thread there we go okay so at this point we're ready to take the wires off of our loom now to do that I'm going to take my flush cutters and right at the base come it down next to that circle and a 1x1 clip off my threads like so I'm also going to use my nylon jaw pliers straighten out those work threads a little bit and I'll do the same thing on the other side using my cutters just separate those wires and got a nice long section on either side to work with so that'll be plenty so I'm going to flip it over and start on this side where the wires are straighter it looks easier to work with at the moment I'm going to scooch my work up just a little bit toward the ends now what we want to do at this point is section off our end pieces into groups of three so I've got it end group of three here one here and one in the center and what I'm going to do with these is create sort of a peacoat effect by adding on three beads and I'm going to use a contrasting color from the previous last row of my weaving I'm adding on starting in the center a gold bead on the fourth wire in from one side and a gold bead on the fourth wire in from the other side I'm grouping these three together and over the top I think I'll take a a purple bead and land all of those wires through the center of that purple bead that's going to bunch my wires together in a way that I can manageably create my wire wrap so for that or I should say my wrapped wire loop it's going to be all three of these wires wrapped around so I'm gonna secure those beads take my round nose plier grip just above the bead and there's bismuth which will scooch up when we're when we're done I'm angling off the top coming around the top prong of the tool and I want to control the size of my loop and stay consistent with that for the remainder of my wraps as well so I'm going to pay attention to the size now I'm going to take all three and coil them around the base of that loop just once maybe one and a quarter times and with my flush cutter I'm going to trim the excess now with my player I can gently close down those ends so they don't catch on anything and I have my first little wire wrap so I'm gonna do the same thing with this side of these three wires and with the three wires on this side and then I'm back up with you to show you how that turned out all right so on on my final rap here and you can see that I've stuck with the order of the beads as I've added the different layers just to keep with the pattern so here I'm on my turquoise layer with the two outer beads of these three wires and then I'll add a purple over the top on the third one that creates a nice tapered effect and what I want to make sure is that I'm getting the tension right as I pull so that each of these three lines is the same length I think I've got that about right I'm also paying attention to the size of my loop and just working that wire around the edge to complete the coil so there we have a little wrapped wire component using the baby joulwan now there's a lot of design opportunity here for different finishing techniques strand reducers multi strand clasps earrings necklaces pendants whatever you can think of and depending on how many warp threads or wires you use will depend on how many wraps you get along the edges so I hope you enjoyed this video all these tools and supplies are available at beadaholique.com be sure to click the notification icon on our youtube channel for all the latest updates we have new videos coming out every week thanks for watching

You recently viewed

Clear recently viewed