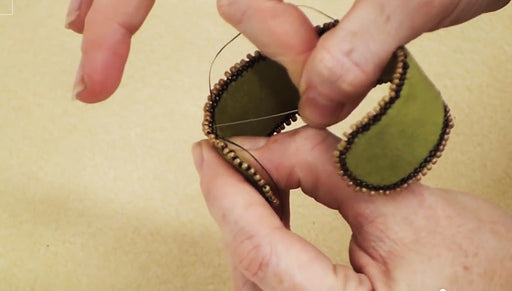
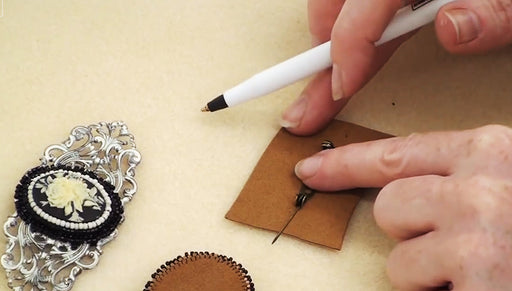
How to Do Bead Embroidery Around Free-Formed Shapes

SKU VID-0235
Designer: Megan Milliken
In this video, learn the basic technique for a free form method of bead embroidery that can be used to fill in any number of shapes. This technique gives a much different look and texture to your bead embroidery.
Audio Transcript
Note: This audio transcript is auto-generated and may not be completely accurate.
Hi this is Megan with Beadaholique.com and today I'm going to show you how to do free form bead embroidery So this is the kind of work that talking about and this piece that I have in progress here if you've watched Julie's videos on Bead Embroidery, she does a really good job of explaining out the basics of how you do two bead back stitch around a shape like a cabochon or a button and it's just concentric circles and that kind of works so the way that I'm doing this kind of bead embroidery is kind of more akin to a crazy quilt I have outlined shapes that I just sketched onto my foundation with a ball point pen and then I'm just kind of using the basic two bead back stitch that she shows you in her videos but in places I am using whatever will fit instead of two beads in a nice circle so it give a really interesting textural look because it's all in rows you can see if you can see the detailed work in there you can see that it goes kind of this way, this way, all over the place to wherever it will fit. I really like that textural effect that it has I'm using Lacy Stiff Stuff as my foundation you will need something like that too to Embroider onto and I'm using nylon thread and a size twelve beading needle and this is something that's important, I'm using Czech glass seed beads and Czech beads are a little less uniformed in size and that is really important A lot of times in bead weaving I know that we're going for that uniformity but in this kind of bead embroidery it's really to have your beads vary in size because you can find the ones that are going to fit in to the size/the opening that you have that you need to fill sells this is a basic overview of the technique that I use for something like this this is not going to be a step-by-step how to reproduced this because it's it's free-form, it really is more of a jumping off point for you to find the shape that you want to fill and fill it in so the first thing that I would do is if you're going to use a cabochon and here I used a large one and each of these little tiny spots here is also a little swarovski flat back so you can glue down anything that you're going going to glue down and then I took a ballpoint pen and sketched out an idea of where I want the other lines to be I'm going to start for the purposes of showing you with just a little sketched out shape on Lacy's Stiff Stuff so take a piece of nylon thread and your going to thread into a size twelve beading needle use about as much as you can comfortably work with at a time and put a knot at the end of your thread and then they're gonna come up from the back side of your foundation to the front and just and pick a place to start and then just like in Julie's video on doing tow bead back stitch We're going to do exactly the same thing except instead of going around the cabochon we're going to follow the line in our sketch so grab two beads and if you haven't done bead embroidery I highly suggest that you watch Julie's videos on that before you try this because I'm not going to go into that much detail about those basics and she does them in her videos So you're just going to continue a two bead back stitch along the line you've drawn on your foundation so you're just gonna keep going just like that around your whole shape, the whole section that you want in this color to be filled in and with something larger like this I worked on this in sections, so first I outlined the cabochon and then I did the outline of my flower and then I filled in the flower and then I went through and I did all the lines for my swirls here and then I worked out from there as you can see here I'm working out from there. So the first step is going to be to outline the initial shape in a basic line of back stitch and just keep going until you're done with the section that you want to work on Once you've finished filling in your basic out line shape that you want to start with, what I did to achieve this kind of effect was I went around again with another color that I wanted to use as an accent if you don't want to do that just filling in if you want to do more than one layer around it you can do that again this is totally free form so it's very much up to you what I'm going to do is use another color now to go in and just fill in so to start with I'm going to just like you would around a cabochon I'm going to just out line this again I'm going to work in just a small part in here so that I can show you more quickly how you would do it but probably if I was going to the whole piece I would just take my next color and go around the edges around outline over and over again or once and then fill in a linear pattern whichever way you want to do it but I'm gonna work from the same point that I ended at so I'm not gonna break my thread. I'm just going to keep going with it and I'm going to just come out next to my row of beads here and continue with the two bead back stitch right next to it and as you do these irregular shapes If you run across a problem that your beads are not quite filling in all the gaps this is where is this kind of Bead Embroidery is different is that your going to end up placing beads of different sizes in whatever you need to you can see as I'm going along because this is such a tight curve here it's leaving alone gap right there between this row and this line here so what I'm gonna do is actually put my needle along the edge there I'm going to look for a slightly more narrow bead in this green color to try to fill that in here's one that's nice and narrow again that's why you want the less consistent beads, you want to use czech seed beads instead of like a delica so you can see I just filled in that little spot and you can do that as you go or you can go back and do it all at the end If I see a spot that I know is gonna need it go ahead and get it done right away and then go ahead and just fill up this whole section with a second layer okay so as you come around and outline the shape again you gonna come to places as you work that have all kinds of little corners and crevasses you can see in a larger example of this type of bead embroidery that as you fill in you might go around once and then then start working up and down this way or this way or across and as you do that you're gonna come to a lot of spaces that look like this or some other variation of this where you don't want to just keep going with both rows because you're going to run out of space and working in this fashion where it ends up with this kind of texture to it all it is totally free formed when I get to a space that's tight like that all I do is kind of play tetris with the beads. I'm just going to figure out how to fit beads in there so that they fill up that space nicely without crowding. Without leaving a lot of empty foundation space showing that will involve using different sizes of the beads it will also involve how many go across and which way you're going to put them which like I said that's how you end up with them kind of all different ways which I really like the texture in the way that that looks at the end I think it's a perfectly fine way to do it and all you're going to do is look at how you can fit beads in there so I can't fit these beads continuing in a V and even if I do just one it will leave a gap over there but I do think I can fit two beads going that way across instead so I'm just gonna fit them in the way that I think they'll work and I wanna make sure that I don't choose really wide beads or else they won't fit those do fit in there and then I have this little teeny spot left right there and I'm just gonna put one more bead going this way across the bead I'm going to put my thread across that way. You just want to look and see at the shape you have to to fill and then find a bead that you think will fill it. It's a lot like doing a puzzle As you can see it does move around the beads a little bit when you fill them in so just try to move them back to where you had them and keep your shapes true to how you wanted the shapes and that's also another reason to try to find ones that will fit the best that you can find because that will keep your shapes from getting really distorted but you can see there I filled in that little pointed spot in there pretty well it moved the shape out a little bit and that's gonna happen so you can kind of expect it. It is like I said it is a free form look and it is going to give it that kind of crazy quilt texture and pattern. You can expect it to do a little bit From here all you would do is decide if you want to stay with this color or to chose a different bead and you can go around again in another row or you can start working across like this if you want it to look like that it's really up to you and your creativity and how you want it to look at the end but this is the basic technique for achieving this kind of a look

You recently viewed

Clear recently viewed