
|
Wire Elements, Tarnish Resistant Gold Color Copper Wire, 26 Gauge 34 Yards (31 Meters) SKU: WNT-2633 $10.45 |

|
Artistic Wire, Copper Craft Wire 20 Gauge Thick, Tarnish Resistant Brass (6 Yard Spool) SKU: WCR-2033 $4.59 |

|
Eurotool Dual Utility Bench Block 3 x 3 Inches - Steel Anvil With Wood Base SKU: XTL-0264 $23.99 |

|
The Beadsmith Jeweler's Chasing Hammer - 1 Inch Head - Metal Smithing SKU: XTL-2152 $13.99 |

|
Wubbers Bail Making Jewelry Pliers - Small 2mm And 2.5mm Size SKU: XTL-0030 $31.99 |

|
Wubbers Bail Making Jewelry Pliers - Medium 3mm & 5mm Size SKU: XTL-0031 $29.99 |

|
Sharp Flush Cutter Pliers - For Cutting Beading Wire (1 Piece) SKU: XTL-5600 $23.99 |

|
Xuron Jeweler's Super Fine Pliers Chain Nose Flat Nose SKU: XTL-5450 $25.99 |

|
Beadalon Large Beading Mats - Prevent Bead Rolling 13 X 18 Inch (Set of 2) SKU: XTL-9935 $6.75 |
Related Videos


How to Use the EuroTool Bench Top Polisher
This video tutorial shows you how to assemble and use the EuroTool Bench Top Polisher. With variable speeds from 1,800 - 7,500 and compact in size,...
View full details
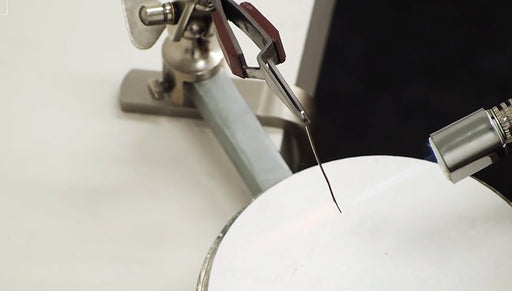
How to Draw a Bead to Make a Sterling Silver Head Pin
In this video, see how to draw a bead on a piece of sterling silver wire. The result is a sterling silver ball head pin. You can use this same tech...
View full details
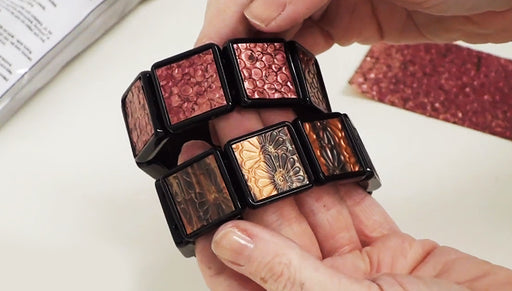
How to Make a Quick and Easy Bracelet with Lillypilly Copper Sheets
If you are looking for a fun, easy, inexpensive, and quick project, then you will love this bracelet. It uses a pre-strung plastic bezel bracelet f...
View full details