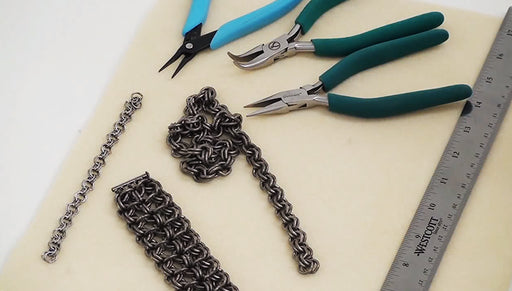
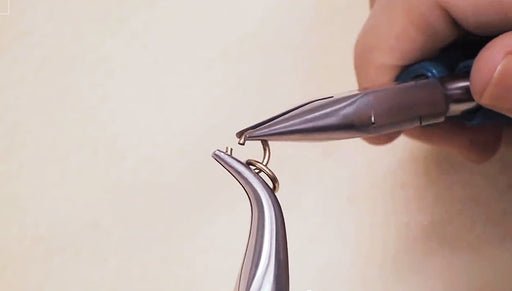
How to Make a Japanese 12-in-2 Chain Maille Bracelet and Ring

SKU VID-0251
Designer: Andrea Morici
Beadaholique's Andrea shows us how to make a flower ring and bracelet using Japanese 12-in-2 chain maille. Definitely one of the prettier chain maille weaves, Japanese 12-in-2 is fairly easy to learn and extremely versatile.
Audio Transcript
Note: This audio transcript is auto-generated and may not be completely accurate.
Hi. This is Andrea for Beadaholique.com Today I'm going to teach you a little chain maille. We're going to be making this ring and this bracelet using the Japanese 12-in-2 chain maille weave. Now to get started I would highly recommend purchasing, we have two little books made by artistic wire about chain maille. There's one called the basics of chain maille. There's one called advanced chain maille. The weave I'm going to teach you today is from the advance chain maille book but I find that it's fairly easy to learn. So let's start with that. The great thing about this book is that the authur tells you exactly what kind of jump rings are needed for each weave and they correspond with the artistic wire packets of chain maille rings that we sell. The reason that this is so handy is because you'll see with chain maille, a lot of times you'll hear terms like aspect ratio, inner diameter and it all gets a little bit confusing. To start off she tells you exactly what you need so you don't have to do the math. So what we need for this project is we need two sizes of jump rings. We need a larger size and the smaller size. I'm using copper color. You can use copper, black, silver, gold and these are eight-teen gauge with a inner diameter of eleven sixty fourth of an inch or 4.3 millimeters. The smaller rings that I'm using are twenty gauge inner diameter of seven sixty four of an inch or 2.78 millimeters. Once again for the smaller rings you can choose any color you want. I this color combination. I think those silver looks really nice against the copper. So that's what I chose. As far as tools go really for this project all you need is a pair of bent nose pliers and a pair of chain nose pliers but I find it very handy to have on hand a pair of fine nose chain nose pliers and a pair of duckbill pliers. Really once you get a feel for it you will know exactly what kind of pliers you need. With any chain mail project it is essential almost to open or close all of your jump rings before you begin the project. The artistic wire chain maille jump rings come partially open. So usually for projects you're gonna need them more open. So use two pairs of pliers to open or close your jump rings. So when I say you want to start with close jump rings. You take your jump ring and torque it little bit until the ends lineup perfectly. And when I say you want to start with open jump rings you open them by torquing away from each other and you want them to be pretty wide open not too far but enough room so you can scoop up multiple rings. So for this project I need all of my copper rings to be opened and only some of my silver rings to be open and the majority of them closed with the ends completely aligned. Also for this project you will need, for both projects the ring and the bracelet you're going to need two packages of the copper rings and three packages at the silver rings. First I'm going to pick up a copper ring using my bent nose pliers. And with this ring I'm going to pick up eight closed silver rings. Once you have eight rings on you can go ahead and close your copper ring. I'm going to take an additional copper ring and I'm going to thread it through all of those eight jump rings so I'm doubling the copper ring. This can be a little bit tricky. Once you have all eight rings on the second copper jump ring I'm going to close a second copper jump ring as well. So now that I have all eight silver jump rings onto my two copper jump rings I'm going to pick up four more open silver jump rings and add them to both copper jump rings. So you should have a total of twelve silver jump rings on your two copper jump rings. What you're going to do you're going to take an open copper jump ring you're going to thread it through two of the closed silver jump rings out of the twelve. Then you're going to take two more closed silver jump rings I'm going to add them to the right half of the copper jump ring. I'm going to close that copper jump ring once more. Then I'm going to add another open copper jump ring to the two silver jump rings that I just added and I'm going to thread them through the two that are connecting it to the double first little unit that we made. I'm going to close this once more. Now you have one petal on your flower. I'm going to do the same thing. I'm going to pick up two on the center of the flower to the closed silver with an open copper. I'm also going to thread the new one the new copper jump ring through the two extra jump rings that we added. Once again before I close it I'm going to add two more closed silver jump rings and I'm going to close the copper jump ring. And I'm gonna double that copper jump ring. Now I'm gonna go through the two that I just added the two silver connecting this petal to the center of the flowers and the two that are going to connect the two petals. Close that copper jump ring once more. You just keep repeating this all the way around the flower and then I'll show you how to end it. Okay now I'm about to add my last petal to this flower. So I want to thread my copper jump ring through the last two silver jump rings attached to the center of the flower and through the two silver jump rings attaching this petal to the one next to it. This time you don't have to add two silver jump ring 'cause we have to do that afterwards. So go ahead and close that copper jump ring and double it. Okay now as you can see you just need two more silver jump rings to connect those last two petals. So we're gonna take two open silver jump rings and I'm going to attach the two petals. There we have it. That's one unit. I already have two other units completed. For the bracelet I'm gonna need petal of seven units plus an extra one for the ring. So I'm gonna go ahead and make five more of these flowered units. So here I have eight finished units of the Japanese 12-in-2. I have seven for the bracelet one extra one for the ring but as you can see I have extra jump rings here and if you'd like you can go ahead and make two more for matching earrings. Right now I'm gonna finish the bracelet. So I have my seven units aligned. What I'm going to do is I'm going to join each unit with two small silver jump rings. The same ones we were using for the rest of the weave in between each. So I have some opened silver jump rings and I'm gonna go ahead and do that now. So that's how you join two of the units and right now I going to do the same thing connecting each of the seven units together. Now that I have all seven units connected I'm going to have to make little extensions on either side and that's for the toggle clasp. I choose this cute little flower toggle clasp to go with it. It also comes in copper. I decided to go with silver. It matches the flower motif of this particular weave. So what I'm going to do I'm going to go ahead and add two open silver jump rings to either end of the bracelet and I'm going to close them. Now that I've done that I'm going to take a copper ring, pick up two closed silver jump rings. I'm going to add it to two silver jump rings I just added at the end of the bracelet. Close that copper ring again double that copper ring. Close that. I'm going to check the length here. That's about how long I want that extension. I'm going to do the same on the other end of the bracelet. Okay all I have to do is add the clasp. This clasp comes with a jump ring already on it but we don't need that. I'm going to take that off and you can save that for another project if you'd like. What I'm going to do I'm going to use a single copper jump ring to attach each end of the clasp to each end of the bracelet. That's one and there we have the other half. Once again I'm going to checked the length and to me this seems a little bit long. So if it is too long for you also you can omit a couple of the double copper links at the end. Let's see how long this exactly is. From end to end it's eight inches long. So if you were to omit one of those sections it'll probably be a really good length. So that's how you make the bracelet using the Japanese 12-in-2. Now I'm quickly gonna show you how to make the ring. That's gonna be the front of your ring. All you're going to do is you're gonna add four extra jump rings to each half. What I'm gonna do is go ahead and open eight of the small silver jump rings. And just like you created a small chain at the end of your bracelet that's exactly what you can do on the ring except for you are not going to double the copper rings. If you double the copper rings there's not going to be enough flexibility for for it to fit nicely on your finger. So what I'm doing, I'm adding two open silver jump rings to two of the adjacent petals on either side. So two on this side and then directly across from that two on that side. So what I'm gonna do now is and take an open copper ring and I'm going to pick up both sets. So that's four jump rings both sets of the silver ones and close it again. I'm going to do the same thing directly across from them so you're making a diamond shape. So now I'm simply going to connect the copper rings of the band with two silver jump rings in between each just like this. In this band including the two points of the diamond it has one, two, three, four, five, six, seven copper jump rings and that makes about a size seven ring. If you'd like it to be smaller I would just suggest removing the middle jump ring and subbing it for a smaller copper jump ring. Here I'm adding my last ring and I want to join this end to this end. As you see this end they really has two closed silver jump rings as does this end. So I'm simply going to take my last open copper copper jump ring and I'm going to slide it through both sets of double close silver jump rings. Give it a twist closed. There you have it. Here's your ring to match your lovely bracelet. So that's how you do Japanese 12-in-2 and there are many different things you can do with this weave. So have fun playing around with it and I hope you learned a lot. Thanks. Go to Beadaholique.com for all of your beading supplies needs!

You recently viewed

Clear recently viewed