How to Make Domino Earrings Using Image Transfers and Aanraku Bails

SKU VID-0077
Designer: Julie Bean
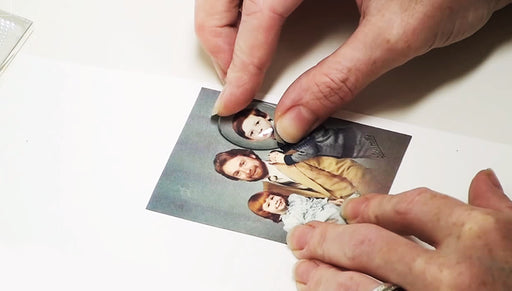
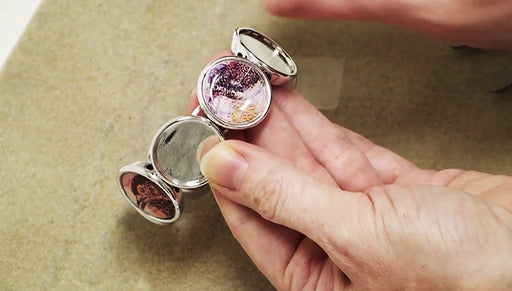
Learn how to make a beautiful pair of earrings using small dominoes, image transfers and Aanraku bails. These step-by-step instructions show you how to make these earrings from start to finish. This techniques in this great mixed media project can be applied to scrabble tiles and bottle caps in addition to the dominoes.
Audio Transcript
Note: This audio transcript is auto-generated and may not be completely accurate.
Hi, this is Julie with Beadhaolique.com and today I want to show you how to make a domino tile earring like this one here. This is the first one of our pair here and together we're going to make it's matched pair this is the domino tile with a transfer sheet laid on top of it I've used an aanraku bail, earring style so that the whole thing is facing forward instead of the side for a pendant and then I used a simple earring hook so what you need for this project is a transfer sheet transfer sheets put out by Nunn Design. This the black-and-white floral graphic on the back of the transfer sheet there's going to be the full instructions we're gonna walk through it with this video but if you want to make more at home you'll have the instructions right there for the total project you'll need two domino tiles I already got one done so I'm going to be using one but if you're doing this for yourself you'll need two you see that they've got the little dots on one side and blank on the other you'll need two of the aanruku bails size small earring bails these are silver plated you'll need two earring hooks for the earring hook you're gonna wanna make sure that it has a open-loop. One that you can just pry open with your pliers and attach it in the correct orientation to the aanraku bail so those are the actual materials you need in terms of tools and supplies. You need a pair of scissors a pair of tweezers paintbrush Nunn Design sealant a bowl of warm tap water a scrap piece of wire E6000 adhiesive a pair of flat nose pliers and then a lent free paper towel or rag so to begin what I want to do I've got my design sheet right here. It's well loved. I've done a lot different projects with here and what's nice is on each design sheet you get two of each image. You could almost see that's divided in half here so you can make nice matched pairs of earrings so I chose this image right here and we're going to do is cut it out the one thing I want to show you with some transfer images you want to be cautious of you look closely it's possible to scratch them with your fingernails or with the tools so you want to be careful not to do that. So handle them gently to begin with I'm just gonna cut it out in its approximate shape going along the edges and then I wanna hold that up to my tile to see the sizing Another reason I didn't try to trace around the edges because of that scratching. I didn't want to hurt the image also. I'm going to carefully and slowly work my way around the image until I get it to be the right size I'm cutting a little holding it up to measure go down on both sides getting closer but not quite there okay so I have the size that I want it now. You can see it fits within the tile I want to round the edges just a little. These are sharp corners where dominoes have nice round corners. Cut very carefully around the corners see what that looks like. No longer has the sharp edges I put my transfer sheet aside and now I got to transfer my image to the tile itself so look at your tile you'd see some have numbers on both sides, some on one side so I want these numbers to show up, so I mean I wanna put my image so it is facing up right here so when I put my bail on the bail will go right here and my little black dots will still show. Lay that down flat the way I know I want it I have warm tap water right here take my entire image. It has a white paper back on it submerge the entire piece of paper into my water let it sit in there for about a minute after a minute remove the image. Have a paper towel ready I have a stiff one here. I pre-curled it. dab some of the water off so using the tweezers pull your image of out the water lay it flat onto the paper towel gently dab away some of the water and I don't want that back to come fully off yet now that I have it like this and I wanna use my fingers and slide it a little bit of that image transfer coming off of the white paper backing carefully line it up pull the backing away press it into place you don't have a lot of a wiggle room with this. Pretty much one-shot you can try to straighten it out a little bit but once it's on there it's much on there don't rub it not harshly just kind of gently if you rub it like this it's going to fly right off of your tile get the air bubble out now you want to seal it so that is pretty much dry the way it is. Maybe a couple minutes but all the excess water is already gone I'm using a nunn design sealant I have a softer paintbrush. It works a little bit better now when you first put on the sealant you'll notice it almost looks like it's repellent it's all going towards the center, bunching up and looks like it's not working. So you just keep painting it on over it again and again until it no longer does that and actually it looks like it's taking I still have some areas right here that look like they're repelling just painting over it and eventually it's going to grab it once you have a full coat on go-ahead set this aside and let it dry for a good ten to fifteen minutes and then go back and do a second coat on top of it and let that dry for ten to fifteen minutes as well before you go onto the next step we painted two coats of the Nunn Sealant on top of the transfer image and now we're gonna go ahead and attach our aanraku glue-on earring bail you see the tab right here is a flat glue on surface. Take some E6000 I have a little scrap piece of wire to use as an applicator so that's all you need, not a lot place it onto the glue-on tab take the top of the tile we're going to put it on the backside you can see how that looks press into place let that dry for a good half an hour before we put on our earring hook so this is now dry. We can put our earring hook on it's not dry enough to wear. Let it dry for couple of hours but what we can do is put your earring hook on. So we're gonna go ahead take your pliers and open up the earring hoop just the same way as a regular jump ring move it to the side. So you're not going to want to pull it out, twist it to the side latch that on to your bail and close that hoop back up That's all that took to make a pair of Domino tile earrings using transfer images and aanraku bails

You recently viewed

Clear recently viewed