How to Add a Large Hole Bead to Beaded Kumihimo

SKU VID-0161
Designer: Julie Bean
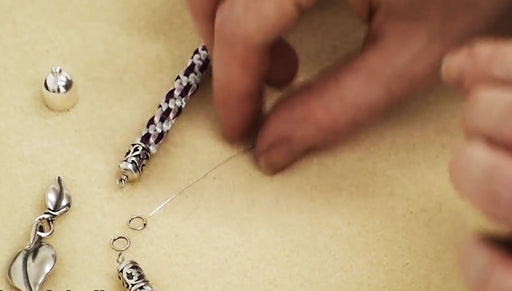
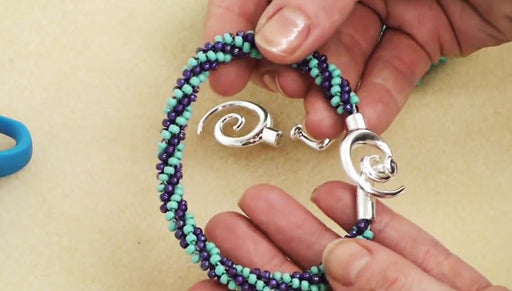
Do you love large hole Pandora style beads and beaded Kumihimo but have not been able to figure out how to combine the two? In this video, see how you can add a Pandora style bead to either wide braided Kumihimo or beaded Kumihimo - which by their nature are too wide to slide the bead over the braiding.
Audio Transcript
Note: This audio transcript is auto-generated and may not be completely accurate.
Hi this Julie with Beadaholique.com and today when I show you how to add a large hole Pandora Style Bead to Beaded Kumihimo so if you're familiar with Kumihimo you'll know that a lot of times you can just slide a bead over the braid which is great if your bead has a large enough holes to slide it over the braid but if your braid is thicker than the size of your inner diameter of your hole or if you have beaded Kumihimo you're not able to just slide it over the braid. So in that case you need to find a way in which you can get the Bead two into the braid work itself and that's what I'm going to show you how to do right now. So here's an example, I made a necklace with a large hole bead between the two segments of Beaded Kumihimo so what I've got going here is I have a segment of Beaded Kumihimo if you're not familiar on how to do that please check out our video How to Braid Beaded Kumihimo and I'll show you how to start this Braid and actually how to do the beadwork as well but right now I want to show you how to add the large hole bead I've got my braiding disk this is where I left off. I've got three strands up top bring one down to the bottom I'm going to do just a little bit of beading here so you can see what's going on so you get the rhythm of it like I mentioned check out our Beaded Kumihimo video to see exactly how to do the step-by-step If you're familiar with that it'll make sense what I'm doing left one up scooting down my bead on my right one and it's going down to my left l want to do a little bit of braiding without any beads so rotate left one up to the left right one down to the right. Rotate left one up to the left right strand down to the right quarter turn rotate left up right down rotate left up right down rotate continue in this fashion until I have about a fourth of an inch of non Beaded Kumihimo braided flip it over. I've got about an fourth of an inch there take a spare piece of cord, thread. whatever you have around the house and I have about a foot here I'm going to take the end of it and I'm gonna pass it under all of my strands pull it up towards the top so I don't want to be pulling it right down here by the beadwork. I want it as close to the top as possible the top meaning where my stands are along the disk and I'm going to tie a simple overhand knot pull tight and I'm just tying a bow that's gonna keep my braiding from unraveling when I pull these off take my bobbins off and when you are doing this with Beaded Kumihimo you only want to load your bobbins with enough beads for the point you're gonna end up needing to stop and add the large hole bead say you're not going to put a hundred beads on here. You want like ten or twenty on that segment before the Pandora style bead once all the bobbins are off and you have your loose strands go ahead and pull them together set their ends meet I haven't taken this off the Beaded Kumihimo disk yet because that's keeping my braiding and my beadwork in place once all use strands are lined up bundle them together take a piece of tape place it over the strands and if you can try to make a little pointed tip you're basically making a tape needle use this to thread your large hole bead let that come to a point take your bead go ahead push the tape through it and pull and now you just very easily past eight cords through the large hole bead at once At this point pop off your cords and this was easy because I knew what my pattern was. I just had two purples, two purples, two pinks and two pinks but if you started with a really unique pattern or all different colors make a note to begin with of where your colors were on your board originally and we're gonna repeat that sequence when we go back and put all of our strands back on the Kumihimo disk sliding my bead down and when I get towards that little bow that I made pull it out and slide my bead over that non beaded Kumihimo braid now if you're a braid was too thick for the beads to slide over, don't worry about it, you don't actually have to do that extra little bit of non beaded braiding, you can just go ahead and tie a bow around the loose strands and then you'll just pull the bead down over it as well and it'll hold it's place Go ahead re-position our Kumihimo disk, first we have to remove the tape I tend to not want to cut the actual strands themselves, I'd just want to cut the tape off because I don't want to loose any length especially if you're doing this where you're going to be adding a lot of large hole beads you don't want to loose too much length line these backup holding my bead in the middle pretend that your bead is your original knot is about where you want so I'm back to my starting point. This is where I started where I first began and came off with the knot so do you remember if you do have a unique pattern going or just doing something simple like this with the two colors they do make a little diagram before you start of where your cords are positioned along the discs and what number they are going to coordinate to you can put them back in that original starting position I'm going to rewind my bobbins now two of my cords had beads on them to do my Beaded Kumihimo a quick tip for getting beads onto satin rattail, this is one millimeter and I'm going to be using 6/0 beads if you try to just thread them on to the cord you've probably experienced this, it's rather hard. They fray you don't get a good tip to it and if you you were to put a needle even have a large eye needle is going to be too thick to go through that hole on the size 6/0 beads so what you wanted to do is you want to create a little bit of a glue needle and all you need to do to do that take a little bit a little bit of glue. I'm using crafters pick put it over the tip of the satin rattail squish it together you're stiffing that up and then you let that dry. When it comes time to put your beads on it's going to be a lot easier I've done that on the ends that I'm going to add beads to it's got a little bit of glue on it it's going to get a lot easier to just sometimes if you twist it a little bit get that satin rattail to go through it. I actually like to have chain nose pliers on hand. Just pull that all the way through load up as many beads as you want. For this demo I'm going to add ten beads on two different strands just to the point of adding my last bead sometimes it makes it a little bit easier to get the the rattail through the beads is cut your tip at an angle. Right through the needle that you created so you have a little bit more of a tip there that we way when you push it through the bead I have a little bit more area to grab onto scoot my beads up towards my Kumihimo disk finish winding my bobbin After you've added a large hole bead you do a little bit of just normal Kumihimo braiding not with the beads so the left one goes up to the left side of the top two, the right one comes down to the right you're very familiar with this if you're used to Kumihimo, if not check out one of our videos which we'll show you how to do Kumihimo beaded and just regular braiding I'm going to do this for a couple passes until I get about a sixteenth of a inch away from the edge of my bead so than I can comfortably have space to continue with my beaded Kumihimo braiding It's not quite an eighth of an inch but almost I'm going to add my first bead same way as normal nothing has changed except for now I have a large hole bead worked into my braid I'm going to continue braiding adding beads as I go. If you are doing a beaded Kumihimo project, if not you'll just continue you're normal braiding for as long as you want until you want to either add another large hole bead or finish off your project I've added more beads and iI'm gonna pop this off so you can see what it looks like. Tie another little bow around my cord so that they don't unravel on me take off the weight pull this through and you can see what we've got so we've got a large hole bead Pandora style bead between some Beaded Kumihimo and you see since we did go ahead and braided some extra without beads looks nice and finished on both sides of the bead and it stays put just like that and that is how you add a large hole pandora Style Bead to Beaded Kumihimo or a large braided Kumihimo Go to www.beadaholique.com to purchase beading supplies and to get design ideas!

You recently viewed

Clear recently viewed