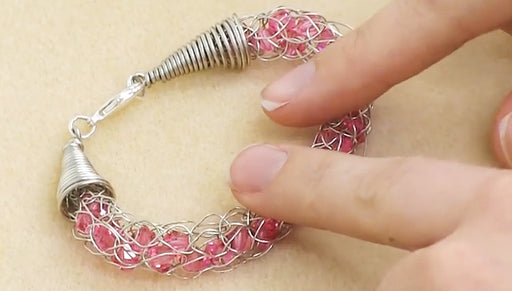
How to Make a Single Coil Wrapped Bead

SKU VID-0618
Designer: Kat Silvia
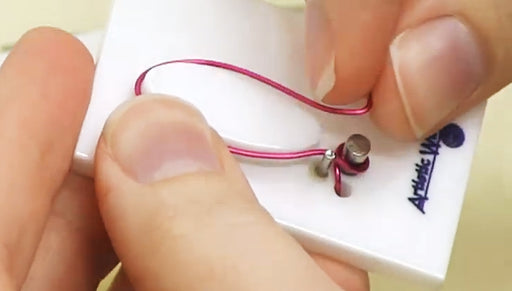
In this video you will learn how to make a single coil wire wrapped bead. By using 18 gauge and 24 gauge wire you can create this wire wrapped bead to fit a 5mm cord. The Wubbers Bail Making Pliers in size Medium (3mm and 5mm) is the perfect tool to help you create a uniform coiled bead.
Audio Transcript
Note: This audio transcript is auto-generated and may not be completely accurate.
Hi, this is Kat with beadaholique.com these beads that I have strung onto our faux leather cord so it's just a simple coil around a coil so I'll show you how to do that today and for this project we're going to need some 18 gauge wire some 24 gauge wire a ruler you're also going to need the wubbers bail making pliers in size medium which is the 3 millimeter and the 5 millimeter you'll need a pair of flush cutters and you'll also need some nylon tip pliers to help straighten your wire to begin take your 18 gauge wire and pull out about 9 to 10 inches or so and you can use your nylon pliers to just go ahead and gently run it across to help straighten out your wire from your coil so now you're going to take your flush cutters I'm going to measure out I'll do nine and a half inches always better with your wire wrapping to err on the side of safety that way if you end up running out of room you have an X range so go ahead and just snip that off and you can set your 18 gauge wire aside now what you're going to do is you're going to take the large the 5 millimeter side of your webber's pliers and go ahead and place it in between and you're just going to twist and just move the pliers as you go so keep it tight up against the webber's pliers so continue to coil and when you get to the back side here you'll just go up and over so you just continue and you're going to do three full coils and you just move it around and as you can see this is loose on the plier so it's not very tight so this is my last coil here and I get to that point where the three full coils match up so now I'm going to take this off my pliers and set this down taking your 24 gauge wire go ahead and use your pliers and straighten out some of this wire from the coil it'll get coiled anyway but it's just easier to work with if it's a little bit straighter so now what I've learned with doing this technique is that to create this coil you need about three inches of it wrapped here which equals about 30 inches of this wire now again like I said before you can't ever add more wire but what you can do is do this little trick that I do when I'm trying to figure out how much wire I actually need so here we have about let's see there's ten I've about will do about 20 inches of wire now I just said that we needed 30 to do this project but what I'm going to do is I'm going to leave it on the spool I'm not going to cut this because once you cut it that's as much as you have and trust me once you start to do many of these you'll want to make sure that you always have enough so go ahead and take your long piece of wire now and what you're going to do is just bend it over and wrap it around once so you have it it's attached to the spool and you have the tail going off that way now I find that it's easier to hold this wire when it's attached to the spool so it will actually make your wire wrapping a little bit tighter and easier for you so go ahead and grip it tightly and don't worry about bending this wire it'll get coiled anyway so go ahead and just you're going to do and the first few coils are always tough but go ahead and just wrap and keep them as close as you can and you're just going to keep wrapping now as you notice this is a little bit further away don't worry about that we can scoot that together a little bit later so just keep wrapping and you're going to continue wrapping until you finish this entire tail so as you come to the end of your wire here you can just finish the last few couple coils and just keep going around and around and once you get towards where it starts to get harder because your tail gets so short it's okay because we have all the wire we need here on our spool so go ahead and just clip this wire and you can take your nylon pliers and just kind of pinch it in make sure it doesn't stick out and poke again we have the coil on here and as you can see my wire has been bent a little bit but again don't worry about that so what you're going to do is you're just going to scoot this coil all the way up until it meets right there where we've created so let's measure so we have about two inches of coil and I said we needed about three inches so go ahead and uncoil some more of your 24 gauge wire straighten it out a little bit and we started with about 20 inches so here's ten inches and I'm going to err on the side of safety and do a little bit extra and I'm going to go ahead and clip that off so now I have my tail coming out the other side so all I need to do now is to continue to wrap an extra inch so we'll just do that with this tail so as we do our last few raps here you just kind of keep measuring and seeing if you're getting close to three inches of your coil so just straighten it out with your fingers there and measure just the coil from there to the end and it looks like we're just under three inches so I'm going to do a few more and the longer your tail is the easier it is to maneuver the wire I always consider it sort of the sacrifice of wire wrapping is that you're just going to have to cut off those tails if you want to get a good tight wrap so that actually gives me just a bit over three inches but I'm okay with that just scootch this down and then again take my flush cutters and cut off my tail take my nylon pliers and just tuck that guy in just like a little squeeze okay so now we're actually going to get to make the coil with it facing this way on this side what you're going to do is you're just going to slip it back into your Weber's pliers go ahead and slip it a little bit further down because you're going to create the bead on top so gently with your pliers you don't need to press very hard what you're going to do is just coil around and just move your pliers and coil and don't worry about the coil separating that will happen naturally but it kind of gives it that sort of ridged look as you can see so keep going should actually get about four rotations so you see the edge line up with the other edge right there so then we just continue and we're just going to wrap the tail of our 18 gauge wire you're going to want to make sure to wrap it a full three times in order to get the back to match up so we have the tip there the tip there the tip there and now I'm going to remove this from my pliers and snip off our little sacrifice tail and that's it so that is how you make the beads that go on the bracelet of Bhutan and it's a single coil wrapped bead you

You recently viewed

Clear recently viewed