
|
Tsukineko StazOn Acid Free Jet Black Color Solvent Ink Pad For Rubber Stamps, 1 Ink Pad SKU: TSM-100 $14.99 |

|
Xuron Jeweler's Super Fine Pliers Chain Nose Flat Nose SKU: XTL-5450 $25.99 |

|
Baby Wubbers Quality Fine Chain Nose Jeweller's Pliers SKU: XTL-0020 $32.99 |

|
Sharp Flush Cutter Pliers - For Cutting Beading Wire (1 Piece) SKU: XTL-5600 $23.99 |

|
The Beadsmith Wire Looping Pliers - Concave And Round Nose SKU: XTL-5032 $14.99 |

|
Open Eye Pins, 2 Inches Long and 21 Gauge Thick, 22K Gold Plated (50 Pieces) SKU: FHP-6220 $5.99 |

|
22K Gold Plated Open Jump Rings 4mm 20 Gauge 22k Gold Plated (100 pcs) SKU: FJR-3914 $5.49 |

|
Earring Findings, Fish Hook Ear Wire 15x15mm, Gold Plated (25 Pairs) SKU: FEA-3020 $7.69 |

|
E6000 Industrial Strength Glue Adhesive (0.18 fl oz) SKU: XTL-1054 $2.99 |
Related Videos


How to Color Lilly Pilly Aluminum Blanks
In this video, see how to color Lillypilly aluminum blanks using sharpie permanent markers and polishing pads. Very easy to do, you can now match y...
View full details

How to Use Vintaj Patinas and Glaze
Now you can color your Vintaj pieces using an amazing array of permanent patinas. Mix colors, create opaque finished or create washes, and use the ...
View full details
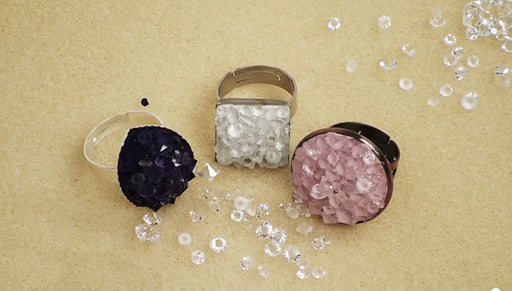
How to Make a Faux Druzy Ring
In this video learn how to make a stunning faux Druzy (also known as Druse) ring. All you need is a bezel ring setting, some epoxy clay, and Crysta...
View full details