How to Do Cellini Spiral Stitch Using Two Hole Beads

SKU VID-1348
Designer: Alexandra Smith
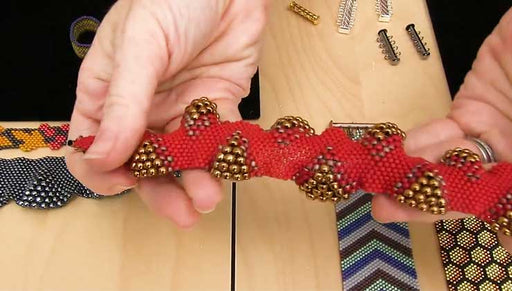
In this video, you will see how to make the Cornucopia Swirl necklace from start to finish by bead-weaving Toho seed beads and Czech glass SuperDuo beads into a hanging focal pendant using Cellini Spiral Stitch. You will see how to sew on a bead cap, as well as how to hang your pendant from chain using an Austrian crystal pearl bead stopper.

The brand name for the crystals shown in this video is no longer available. High quality Austrian crystals are now available under the PRESTIGE™ Crystal Components line.

FEATURED IN THIS VIDEO
Audio Transcript
Note: This audio transcript is auto-generated and may not be completely accurate.
hi this is Alexandra with beadaholique to do Cellini's spiral stitch using two whole beads here's a project that I've finished using this technique a beautiful woven focal pendant and in this video I'm going to show you a color variation on this same design so for this project I'll be using a couple of pairs of pliers flat and round flush cutters thread snips I've got some twisted rope chain bead cap and a Swarovski crystal pearl for the stopper some wire and fireline and for my beads I have beautiful mix of a super duo autumn fire Toho's in size 8 oh a couple of eleven O's and a 50 nose so it's it again I'm going to cut four feet of fire line if you are new to shalini spiral you may want to reference our video on the basic stitch although I will say this is very similar to that you know four feet this is my fourth time to test finer line and I'll take my size twelve beading meal get that on there and now I'm ready to string on my beads so I'm gonna take on 450 no beads two of the first color of my eleven owes to the second color of my eleven ODEs two of my a toe and two of my super duo then I'll work in reverse and take on two of each on the back end until I get to the 15 s I'm not going to add any more of those I added four to begin with and I'll show you how this pattern works up so here I have my beads loaded on and what I'm gonna do is tie a double overhand knot so that the beads are in a ring and I'm leaving myself a bit of a tail so that the knot doesn't come undone from the start I'm sure it lands in between where I wanted just for security I'm gonna do one more take a third knot on top of there having made my knot I am ready to begin my second round of bead weaving so for that I'm going to start by coming through two of my 15o beads I'm going to add a 1500 bead skip one and double back through my fourth 15 oh that will be my first stepping up bead next I'm going to add another 15 Oviatt skip the first Siller and come through the second little tail out of there then I'm gonna add a silver whatever a color I'm coming out of that's the one I'm adding so I'll skip my first orange and come out the second and I'm gonna add an orange skip the first green and come out the second add on the green yeah this is where I am stepping up into my second hole of my super duo so from this point you can add another super duo by taking a bead either hole doesn't matter it's gonna come in between those two and lay nicely once I thread through fits right into itself I'm gonna add one more super duo skip that green come out the second green add another green skip the orange come out my second orange add another orange skip one silver and come out the second from this point I'll be starting my third layer of weaving now I've got a little extra 15 oh that I'm going to come up through here not before I add my next silver though I need to add my next silver I'm gonna skip 115 and come up through into my third layer of weaving add another 15 go through my next 15 and add another into my silver add another silver into my orange add another orange as I come around the tension of the thread will start to pull the piece into a conical shape adding a green here's where I'm gonna step up into my second hole of my super duo add my next super duo with a color mix like this I'm just using my designers eye to pick which colors I like laying next to each other and create a nice blend picking up another super duo skipping a green going through a green picking up my green and coming through my orange picking up an orange coming through my silver picking up a silver coming through my 15 oh bronze and so forth so I'll continue this you know check in with you after a few rounds to give you a sense of the pattern as it builds so you can see that my design is starting to take shape the spiral is forming and I wanted to clarify that this design takes two of the large beads the super duos whereas the traditional Selenia spiral weave takes one of the large beads so that's the main difference in this variation on the weave takes two super duos and also 250 nose which the other design does as well so I'm working my way around I just wanted to reiterate the pattern for you know that we're past our starting point it starts to get a little clearer the farther you get into it so here in my 8o I'm gonna take another a Toby it come up through the second hole of my super duo add another super duo tuck it between and add another super duo coming through my a toe bead and I'll continue this all the way around to get a focal of this size I use ninety super duos and that's how I get the length so once I have it finished I'll demonstrate the tying off process and also how to sew on the bead cap and hang it from a chain using wire with this beautiful Swarovski pearl alright so I'm back I have one on 90 of my super duo beads and I've finished up with one of my green beads I'm gonna double back through an 11 oh and tie the thread off in a nice secure spot on my weaving between two of those beads bring that around one more time and I'm ready to clip my thread now I'm ready to sew on the cap to my piece this is a twelve millimeter filigree bead cap brings out a lot of the shine of the piece and I already have enough thread here that I'm working with my needles already thread it on so I'm just gonna keep this same thread and come through the top of my first layer of weaving and tie it back up onto this side of my piece and do a double overhand knot okay clip my extra yeah so on my cap I'm gonna come through one of the scallops at the edge line it up with my weaving and find the best spot to begin sewing the fireline it's not an exact science it's just a matter of finding where it lines up best to balance that cap off the top so I'm gonna start my way through a bead that looks accessible and I'm going to come through the next scallop and continue around the edge cut through this green one here upstairs the next scallop and pivot looks like the second hole of this super duo might be a good spot come through there up through my next scallop and so forth see if I come through those two I think it lines me up with this one here try not to poke myself pretty much all the way around now a couple more to go coming up through the scallop the trick is to find a bead cap that fits the right size for the beads so I was happy to find this one all right I think I am back to my first scallop I could go around again but I don't feel like I need to so I'm going to tie it off now just by coming back through a bead and finding a good closing point I'm going to get in between those beads under that thread create a knot there string through a couple more beads try to hide the thread as best I can and create one more knot up in here double that up and then I'll thread back through a couple beads to hide the end before I clip the extra and that part will be done so now I've got my bead cap on there and I'm ready to add my pearl so for that I'm going to cut myself about four inches of this 22 gauge wire I'm going to create an eyepin that will be going through the body of the focal so to do that just take my round pliers bend at an angle wrap over top clip the extra and I'll secure that make sure it's nice and flush so there's not my pin and I'm gonna hang my pearl off using my head pin here create another simple wire loop off the top of this one like so click the extra I'm gonna hook my pearl onto my eye pin and close that up tight so there's my bottom portion it's ready to thread up through the center of my focal right into the middle hole of my cap so I just need to line that up it's like there may be a bead in the way so it's just a the challenge of threading the wire through that center hole alright so got that threaded through the center hole of my cap I'm gonna pull the Swarovski pearl flush against the bottom and that's a nice stopper for my piece and I'm ready to wire wrap the top I'm gonna grip angle and create a loop that's large enough for my chain to come through it and I'm ready to coil around the base once twice I always like to make a more substantial connection by wrapping up and over previous wraps I grab my other plier to get a nice tight wrap here okay clip and bring in my twisted rope Chan so I've got a mix of metals here which I kind of like the way that they play with the antique and the sparkle of the colored beads this is it's 32 inch chain which will hang it nicely down along the torso now I'm ready to add my clasp so I've got a six millimeter jump ring get it out to one side just loop it through those two end links and create a nice flush closure on this side here's a bit of a trick I like to do sometimes if I don't have the right size jump ring if I know that my chain has a seen why would you use it like a jump ring close it up you have finished my cornucopia swirl necklace I hope you enjoyed this video it's a very rewarding variation on these beautiful designs and these project bundles materials and supplies are all available at beadaholique.com please subscribe to our YouTube channel for all the latest updates thanks for watching you

You recently viewed

Clear recently viewed